
A question that we hear a lot when companies are using Office 365: who has access to my data? A valid question to think of when you are planning to use public cloud services like Office 365. Microsoft offers with Office 365 a full productivity suite from the cloud. For some components of Office 365 Microsoft is responsible for the security but the end user – customer – has also some controls to work more secure with Office 365. This article gives an example of one of those controls: data encryption in Office 365.
Built in data encryption
Office 365 is a Software-as-a-Service (SaaS) application. An attribute of a SaaS application is that the vendor, in this example Microsoft, will handle a lot of the maintenance and security for the customer. In most cases, no complex implementation is needed to use a SaaS application. With Office 365, Microsoft doesn’t have access to the data of the customer while it will maintain the service for the customer. The customer should always give Microsoft permission to access the data. For example, for troubleshooting. This feature is known as ‘Customer Lockbox’ in Office 365.
SharePoint Online & OneDrive for Business
Microsoft uses different levels of encryption for the components of Office 365. For SharePoint Online there is ‘content level encryption for data at rest and in transit’ active. In the past Microsoft encrypted a Document Library in SharePoint Online. When a hacker finds his way into the Document Library he or she had access to all the files that where stored within that Document Library. That is not a desirable situation.
Microsoft has added ‘content level encryption’ to SharePoint Online. Every individual file is encrypted now. Each file will be divided into chunks of 64k. Those chunks will be encrypted individually and the keys are stored in separate Azure containers. When a hacker want to access a file he or she needs to access all the chunks of the file and decrypt each chunk with its own key. The combination of all those separate parts are needed to get access to the master key. This key is stored in Azure Key Vault.
The method of Content Level Encryption that is used for SharePoint Online is also applicable for Office 365 OneDrive for Business.
Exchange Online
In Office 365 Exchange Online ‘encryption for data at rest’ is used for a while now. Microsoft added ‘Disk Level Encryption’ recently. Uses could encrypt data that is stored in Exchange Online.
More granular options for encryption are added in Exchange Online. It is possible to encrypt individual mailboxes with Mailbox Level Encryption. Every individual mailbox has an own key. This key is stored in Azure Key Vault. With this type of encryption it becomes harder for a hacker to get access to a mailbox of an user.
Bring Your Own Key (BYOK)
It is possible that a customer brings his own keys. With these own keys the data is encrypted and decrypted. These keys are stored in Azure Key Vault. The benefit of BYOK is that only the customer can decrypt the data that is stored in Office 365. The process for BYOK could be added for Exchange Online but also for SharePoint Online and OneDrive for Business Online. The process of Content Level encryption for SharePoint- and OneDrive for Business Online it the same as described above.
Besides those content level encryption, that is handle in most way by Microsoft, the customer has some additional controls to encrypt data. Those options are described in detail in the following paragraphs. Be aware of using BYOK with Exchange Online: there are some limitations when you use BYOK for Azure Rights Management Services (RMS) / Information Protection and Exchange Online. These restrictions are:
(https://docs.microsoft.com/en-us/information-protection/plan-design/byok-price-restrictions)
- Protected emails or protected attachments in Outlook Web Access cannot be displayed.
- Protected emails on mobile devices that use Exchange ActiveSync IRM cannot be displayed.
- Transport decryption (for example, to scan for malware) and journal decryption is not possible, so protected emails and protected attachments will be skipped.
- Transport protection rules and data loss prevention (DLP) that enforce IRM policies is not possible, so RMS protection cannot be applied by using these methods.
- Server-based search for protected emails, so protected emails will be skipped.
Secure communications with other enterprises
Most enterprise are communicating in a digital way with each other. A common method is to use email but also instant messaging, portals, apps, etc. are used for communication and to share information between users.
Within Office 365 there are different options available to encrypt email traffic so that communication is more secure and information cannot be read by third parties. Office 365 has the following two solutions available to encrypt business-to-business communication: S/MIME and Azure Rights Management. S/MIME is available for a while now. Messages that need security are signed by certificates. S/MIME is not a very popular solution now days because it is a point-to-point encryption solution. An administrator of security officer is not able to see messages that are encrypted with S/MIME. This is not a desirable situation when messages need to be scanned for viruses or need to be inspected. This signing is based on certificates. So, an enterprise should implement a Public Key Infrastructure that is able to deploy certificates. In most cases this is a complex implementation project. Because of all those complexity, Azure Rights Management is used more and more to encrypt business-to-business communications.
Azure Rights Management is not only a solution to encrypt email messages (like S/MIME). Azure Rights Management is a more complete Data Loss Prevention solution. E-mail messages could be encrypted, but document could also be protected. Not only with the addition of encryption but also to add other security policies like: make it impossible to forward a message, print a document or copy a document/file to a personal Dropbox account.
So, it is possible in Office 365 Exchange Online to activate and configure S/MIME or Azure Rights Management to encrypt communications between enterprises. When only encryption between an enterprise and an individual person is needed – with just a SMTP address – Office 365 Message Encryption could be a solution.
Communicate safely with individuals
There are a lot of scenarios whereby it is desirable or even mandatory – for example for compliance – to encrypt the communication between an organization (enterprise) and an individual person. An individual person is in this context a person with a private mailbox like Hotmail, Live, Yahoo, Gmail, etc. This person only has this e-mailbox and has no access to an enterprise mailbox within an organization.
You can think of a scenario where a doctor needs to share medical information with a patient. In this scenario, it is desirable that the communication will be encrypted so that only the doctor and the patient can read the information. Another scenario could be, a civil servant wants to share Personal Identification Information like a Social Security Number with a civilian. The civilian only has a private mailbox. Information needs to be send securely but the end user experience should be easy so that the information could be consumed easily. Microsoft added Office 365 Message Encryption (OME) for this scenario.
Office 365 Message Encryption example
The following example will explain all steps of Office 365 Message Encryption.
For this example, we use the scenario where a civil servant needs to share a Social Security Number with a civilian. This civilian uses a Google Gmail mailbox. The policy of the organization is that information that contains Social Security Number should be encrypted. Encryption should be added automatically. When the civil servant should perform a manual action to encrypt the message – information – it is possible that this step is not performed and encryption is not active. That’s the reason why the organization want to add encryption automatically.
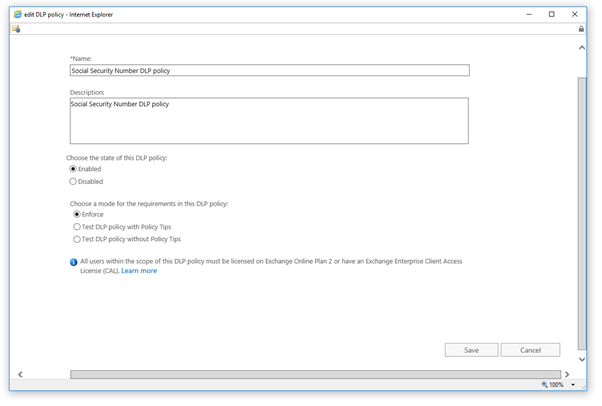
The first step to configure this scenario is to add a ‘Data Loss Prevention Rule’ (DLP) in Office 365. In this example, we are using email communication so we need to create a DLP rule in Exchange Online. Through the Office 365 Security & Compliance Center we open the Exchange Online Admin Console. There are three options to add a DLP rule:
- Custom
- Import
- Template
The first option (custom) is a fully custom configured DLP rule. This option gives an administrator the most flexibility. The import option is useful when there is an active DLP rule in another Office 365 tenant and this rule should be re-used. It is possible to export DLP rules (XML format) so that exported files could be imported and re-used. The third option is to create a DLP rule from a template. In Office 365 you can find more than 80 templates for different branches. For example: finance (PCI data), healthcare (HIPAA data), etc.
For this example, we will use a DLP rule based on a template. This template is pre-defined that it will recognize a Social Security Number. We only need to active encryption when a Social Security Number is send to an external email address. We could activate the DLP rule immediately or choose to use the DLP rule in ‘test mode’. With the test mode, it is possible to monitor the DLP rule hits. Optional it is possible to configure the rule so that the message is first forwarded to an internal person. For example, a security officer or manager. When he/she agrees to send the message to an external person the message is sent with encryption active. A policy tip could be configured to notify the end user that he/she is about to send sensitive information to and external address.
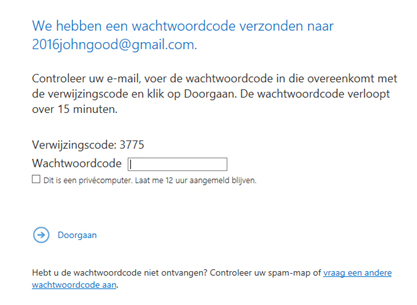
The employee of the organization will not notice that a message that contains sensitive information is send to an external user. When we send a Social Security Number to 2016johngood@gmail.com the message will be encrypted automatically. The civilian will receive a message that he/she should log in to read the message. Three methods could be used to log in: with a Microsoft account, with an organization account and with a One-Time-Passcode (OTP). The civilian could log in with a One-Time-Passcode. The civilian will receive the OTP as an email message in the mailbox and this code could be used to log in. There is a time limit of 15 minutes to log in. When the log in is performed, the message will be opened in a new browser window. Outlook Web Access is used for this. So, encryption will be active even when the end user sends a reply on the original message.
It is possible to change the look and feel of the message that an end user will receive. The table below shows the PowerShell commands for this customization.
| Item | PowerShell |
| Default text that accompanies encrypted email messages
The default text appears above the instructions for viewing encrypted messages |
Set-OMEConfiguration -Identity <OMEConfigurationIdParameter> -EmailText “<string of up to 1024 characters>”
Example: Set-OMEConfiguration -Identity “OME Configuration” -EmailText “Encrypted message from ContosoPharma secure messaging system” |
| Disclaimer statement in the email that contains the encrypted message | Set-OMEConfiguration -Identity <OMEConfigurationIdParameter> DisclaimerText “<your disclaimer statement, string of up to 1024 characters>”
Example: Set-OMEConfiguration -Identity “OME Configuration” -DisclaimerText “This message is confidential for the use of the addressee only” |
| Text that appears at the top of the encrypted mail viewing portal | Set-OMEConfiguration -Identity <OMEConfigurationIdParameter> -PortalText “<text for your portal, string of up to 128 characters>”
Example: Set-OMEConfiguration -Identity “OME Configuration” -PortalText “ContosoPharma secure email portal” |
| Logo | Set-OMEConfiguration -Identity <OMEConfigurationIdParameter> -Image <Byte[]>
Example: Set-OMEConfiguration -Identity “OME configuration” -Image (Get-Content “C:\Temp\contosologo.png” -Encoding byte) Supported file formats: .png, .jpg, .bmp, or .tiff Optimal size of logo file: less than 40 KB Optimal size of logo image: 170×70 pixels |